Showing posts with label Survival. Show all posts

Monday, May 28, 2012

More Edible Wild Plants

Here are some wild plants ( and parts of trees ) that are edible.

Cattails
These plants can be found next to ponds, swamps, lakes, and wherever there is some swampy area.  Pull them up and you can eat their tender white base in early spring.  In July, when the brown "corn cob" at the top of the plant is first developing ( it will look like a green tube ) you can eat it.  Snap it off and peel the husk away, then boil or roast them.  It tastes like corn on the cob.  The roots can be eaten ( once they are peeled ) once roasted.


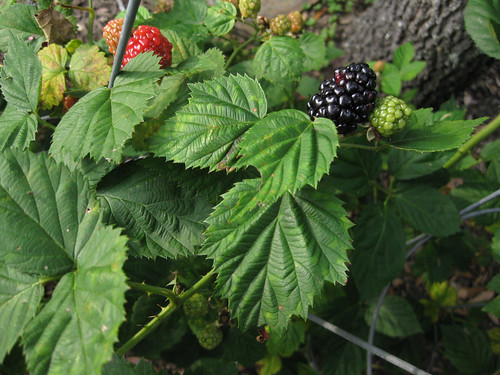
Blackberries
These plants are great because you can find them almost anywhere!  They taste great and they are usually at their peak in ripeness in June and July.  Eat the black ones right on the spot or eat them back at camp after you wash them with water that has been purified before you eat.


That's all for now!

Thursday, March 29, 2012

Edible Plants

There are many edible plants in the wild here are some of them and a little about the plants.

Wild Strawberries
The wild strawberry is packed with vitamins A, C, and K.  The leaves are somewhat oval in shape and serrated.  They can be eaten when they come out in the spring and the berries eaten in late summer.  As the picture shows, the plant has 3 leaves on the end of each stem and the flower is white with the yellow center.  Do not eat anything other than this, there are other things that look much like the edible wild strawberry, but are very poisonous!


Clovers
Clovers have a good amount of protein in them.


Dandelions
Dandelions have a lot of vitamin A, C, iron and calcium.  The entire plant is edible.  Eat the leaves while they are young.  If you eat mature leaves they will be bitter.


Thats all for now.

Thursday, January 5, 2012

Polyester Jackets

If you are wanting to have something lightweight and warm, polyester will do the trick.  While it is not waterproof, it can keep you warm.  But since its not waterproof, you can put an oversize poncho over it and you should be fine.  I like the polyester mostly because of its lightweight-ness so you don't get weighed down like some other warm but heavy coats.  But also polyester is also bulky in a way if you want to pack it in a backpack but it can be squished down if you put it at the bottom of the pack.

Tuesday, January 3, 2012

Micro Fishing Rod

Have you been in a survival situation and would have liked to have a fishing rod?  Personally I haven't.  But if I needed a micro fishing rod, I would have one.  Could you guess what its made of?  A popsicle stick.  Yes, a popsicle stick.
How you do it is you get one of those giant popsicle sticks and wrap some fishing line around it width-wise in the middle.  You only need to do a couple times around then tie it with a bunch of string left over for the fishing line.  Put a little bit of tape (any kind, though duct tape or electrical tape will most likely work best) over the wrapped around line to keep it in place.  End of the fishing line that will be cast out tie on a hook, attach some sinkers, and a bobber if you have one.

Saturday, December 31, 2011

Find Your Direction

"We have our heading!"  You hear that every now and then in the movies.  And if you want to find you direction in the wilderness, how do you do it?
First, you should always have a compass.  If you don't have one, and you want to find your direction in the morning, east is the direction of the sun.  If you point your right hand to the general direction of east then you should have your left hand in the general direction of west.  Your face will face north and you back south.
At midday if you walk east the sun will be on your right shoulder.  Walk west and the sun will be on your left shoulder.  Walk south and the sun will be shining in your face.  Walk north, of course, the sun will be at you back.

Friday, December 30, 2011

Be Prepared! The Basics

Be prepared.  Be ready.  Get ready.  We've all  heard that.  You should always be prepared if you may need to survive.  You will need these things or do these things to be prepared to survive:
1.Practice you skills at home before you may need them in a survival situation.
2.Keep a clear mind. Look at the positive in everything.  Have a "well it could worse" mindset.
3.Be an opportunist.  For example, if you come along something useful grab it right there and then rather than coming back for that thing later, because you might not remember where that thing is.
4.Always have a plan B.
5.Wear the proper clothing.
6.Bring a survival kit.

Wednesday, December 28, 2011

Mini Survival Kits

Survival kits are very important.  But they don't have to be heavy and big and bulky.  You can make a survival kit and put it into an Altoids container or a Ziploc bag!  You can put these contents into them (maybe not all of them due to the size of the container):

Matches
Cotton balls (for fire starting)
Bandaids
A couple candles
Fishhooks
15 pd test line (for fishing and you can use smaller, but no smaller than 8 lb test line)
A couple split-shot sinkers
A small pocket knife
Snare wire

You can add a couple more items if you wanted too, like a cigarette lighter for fire lighting and alcohol swabs for injury cleaning.  Always include a compass.  You also want your kit to be waterproof.  So if you make one out of an Altoids tin then you could cover it in a Ziploc bag, and the bag should keep it waterproof and you can use the bag for other things too.

Monday, December 12, 2011

Essential Skills for Survival

These are seven essential survival skills that everyone needs to know if your caught out in the middle of nowhere and need to survive.  I will show you how to make a fire in almost every weather, types of shelter, find food and water, dress right for the climate, signal for help, and first aid.

1.Fire 
Fire is a great confidence builder.  It will keep you warm, cook your food, purify water, and keep animals away. But we need to start the fire.  Okay, lets do so.
First you can use matches to start a fire.  Some waterproof camping matches would work well.  Or you could bring a cigarette lighter with you which will light over 1,000 times and will work even when wet.  Flint and steel will also work too.  Using a magnifying glass will work if the sun is shining brightly and overhead.  Move the lens  back and fourth until the sunlight is shining though the lens in a bright, small dot.  This way it won't take long to start a fire.  This will also work with a camera lens in the same way.
Tinder can be small dead twigs, dead grass,  the inner bark of dead trees, dead leaves, and dry evergreen needles.  You can also carry a little bag full of tinder  just in case it rains.

2.Shelter
Now that a fire is built, you will need shelter.
A lean-to shelter would work well.  You find 2 trees that have a good sturdy branch about 6 feet above the ground.  Remove all of the branches near it except one one the same side of each tree.  Find a thick sapling near 10 feet tall and use it to lay across the two branches to form the ridgepole.  Find other saplings (big saplings that have been knocked down will work too) Around 8-10 feet long and lay them on the ridgepole to form the roof.  Then weave flexible twigs and sticks through the roof poles to make the wall or use evergreen branches.
If you brought a tarp with you then you can make an A-frame shelter quite easily.  Simply lean a downed tree against a fork in a tree a couple feet from the ground and put the tarp over it.  Then tie the tarp down on both sides.  If you don't have rope or twine to tie it down then you can use good sized rocks to weigh it down on both sides.

3.Water
Water can be found everywhere on the planet.  If there is a stream close to your campsite then go fetch some water and boil it over a fire for ten minutes to kill all the contamination that the water may contain.  You can use a pot if you brought one or a rock that can hold an amount of water.  However, if you have no choice, then drink the cleanest and coldest water you can find.

4.Food 
Food is accessible even in the most remote areas.  If there is a creek that is big enough or a pond there may well be fish in them.  Fishhooks can be made from animal bones that have been sharpened, nails can be made into fishhooks by bending them, even thorns can be made into hooks.  If you don't have fishing line with you, you can make boot laces into fishing line and a leather belt cut into thin laces will work too.  As I've written down in another article about minnow traps, you can catch those and use them as bait or you can eat them.  Just squeeze them to take the waste matter out of them and you can eat them raw or roasted.
Small game can be caught by making a snare by tying a hangman's noose by tying a loop at one end of a piece of string, wire, cord, or twine and pushing the other end though the loop. When pulled on, this loop will tighten, strangling the animal till the survivor arrives.  The animal will put its head through but won't be able to pull its body through.

5.Clothing
 You need to be ready when you go out into the wilderness to wear the proper clothing for that climate.  And pack for the worst thing that could happen.  You will need the extra clothes to keep you warm and dry.


6.Signaling for help 
If you  need to signal for help.  You can get to a clear area and make an SOS sign with rocks or pine boughs.  SOS, by the way, isn't an abbreviation, it just stands as a distress signal.  A fire can also work well because rescuers can see the smoke.  And if an aircraft is about to fly over you, try to get into an open area and hold both hands up.  This signal means "I need help".  Don't hold up just one because that signal means "I don't need help."  You can use reflective mirrors to get the pilots attention by putting the reflective light inside the cockpit.  Then after you get the pilots attention, (which you can tell after the pilot rocks the plane side to side or after they "nod" the plane) do your two hand signal.
 
7.First Aid
Always bring a first aid kit just in case you need to treat any injuries that might happen.  At least bring along bandages and alcohol swabs to clean cuts.  You can also bring Q-tips and plenty of water purifying tablets if you want them.

Friday, December 9, 2011

Minnow Traps

Your exactly in the middle of nowhere.  You are trying to survive and get back to civilization.  You spot a stream off in the distance.  You go to it thinking it might gold some fish.  When you get there, you see that its too small to hold big fish, only minnows.  There are some minnows swimming around, and you don't have a trap.  Then you see a discarded water bottle lying in the stream.  Now you can make a trap.

Making a trap
You can make a minnow trap with one or two bottles.  I will show you how to make a trap with the on bottle for now.

One Bottle
Supplies:
-a bottle
-scissors or a kinfe
-string or twine

So now that you have the supplies, you need to make the bottle trap.  Follow these steps:
1. Take the bottle and cut the cap off a couple inches below the cap
2. Now put the top that you cut off and put it inside the bottom part of the bottle to where the cap is facing the bottom (and if the cap is on take it off)
3. Punch in some holes with your knife or with an awl that is on some types of knives
4. Thread some string through the holes and tie it off with a strand left to tie to something near the shore so it won't float away

To remove the fish, just pull the string out and get those fish.  Minnows are edible and can keep you from starving if big fish are hard to catch.  Hope this trap works!

Thursday, December 8, 2011

Dakota Firehole

The Dakota firehole is a very efficient fire pit; it uses less wood and produces more heat.  This little fire hole is easy to make and offers (after you dig it) you less work to get firewood because of its efficient use of firewood.  This fire pit may require more work than just having the fire on the ground, but it produces much more heat for cooking and warming.

Where to put it 
Now we need to know where to put the Dakota firehole.
  • Don't put it in areas that are hard to dig.  Such as rocky areas or places filled with tree roots.
  • Where soil is wet to where the pit might fill in with water.
  • Dry soil such as sand because it might not hold its shape when dug into.
Digging the Dakota Firehole and Airway
Now that we know where to put it, now we have to dig it!
  • First dig a hole that is about a foot deep and has an circle opening at the top about a foot across.
  • Then find out the direction the wind is blowing. 
  • Once the wind direction is determined, start digging a hole around 6 inches across about a foot away from the main pit.
  • Angle the tunnel to where it will meet the bottom of the pit, this is the airhole of the pit that makes the firehole so efficient.
Now you have dug the fire pit start the fire and get warm and cook some food if you want too!


How it works
The diagram shows how the firehole is so efficient.  The hot air produced by the fire powerfully sucks in air though the airhole making the fire hotter. A cycle then develops: as the fire gets hotter, the more air gets sucked in making it even hotter.  This means more heat with less fuel.  This also means a hotter fire = less smoke.  The heat is concentrated in an upward direction because of the chimney where you can use the heat for cooking and warming yourself.