"We have our heading!" You hear that every now and then in the movies. And if you want to find you direction in the wilderness, how do you do it?
First, you should always have a compass. If you don't have one, and you want to find your direction in the morning, east is the direction of the sun. If you point your right hand to the general direction of east then you should have your left hand in the general direction of west. Your face will face north and you back south.
At midday if you walk east the sun will be on your right shoulder. Walk west and the sun will be on your left shoulder. Walk south and the sun will be shining in your face. Walk north, of course, the sun will be at you back.
Saturday, December 31, 2011
Friday, December 30, 2011
Be Prepared! The Basics
Be prepared. Be ready. Get ready. We've all heard that. You should always be prepared if you may need to survive. You will need these things or do these things to be prepared to survive:
1.Practice you skills at home before you may need them in a survival situation.
2.Keep a clear mind. Look at the positive in everything. Have a "well it could worse" mindset.
3.Be an opportunist. For example, if you come along something useful grab it right there and then rather than coming back for that thing later, because you might not remember where that thing is.
4.Always have a plan B.
5.Wear the proper clothing.
6.Bring a survival kit.
Thursday, December 29, 2011
How To Sight In Your Bow
If you have a compound bow and you want to sight in your sights (if you have any) then here is what you do.
First shoot a group of three or four arrows at the bulls-eye of the target. Wherever the arrows go that is where you move you sights. For example, your arrows go left and above the bulls-eye. Move your sights up and left. This is called "follow the arrow." It rhymes doesn't it! Sight your sights wherever your arrows go till they hit the bulls-eye consistently. Pretty simple huh!
First shoot a group of three or four arrows at the bulls-eye of the target. Wherever the arrows go that is where you move you sights. For example, your arrows go left and above the bulls-eye. Move your sights up and left. This is called "follow the arrow." It rhymes doesn't it! Sight your sights wherever your arrows go till they hit the bulls-eye consistently. Pretty simple huh!
Wednesday, December 28, 2011
Mini Survival Kits
Survival kits are very important. But they don't have to be heavy and big and bulky. You can make a survival kit and put it into an Altoids container or a Ziploc bag! You can put these contents into them (maybe not all of them due to the size of the container):
Matches
Cotton balls (for fire starting)
Bandaids
A couple candles
Fishhooks
15 pd test line (for fishing and you can use smaller, but no smaller than 8 lb test line)
A couple split-shot sinkers
A small pocket knife
Snare wire
You can add a couple more items if you wanted too, like a cigarette lighter for fire lighting and alcohol swabs for injury cleaning. Always include a compass. You also want your kit to be waterproof. So if you make one out of an Altoids tin then you could cover it in a Ziploc bag, and the bag should keep it waterproof and you can use the bag for other things too.
Wednesday, December 21, 2011
Good Deer Hunting Weather
The weather causes many things to happen to hunting and fishing. I am going to explain the basics on what weather is best for hunting.
The Best Types of Weather
The best time or day to hunt is when it is cool and cloudy or overcast day and little sunlight coming through with little or no wind. For more visit http://www.accuweather.com/en/outdoor-articles/sportsman/best-weather-for-deer-hunting/57818
Also deer activity spikes right before and after good storms. A light rain also won't prevent deer from going about their daily business, this also seems to make deer less wary. This also means the hunter can get in the hunting area silently because of the wet leaves.
One last tip is to use common sense. Deer seek shelter in a big storm just like you would. And a light rain shouldn't bother you at all. And a blizzard that is coming soon would tell you to go to town and get all the thing that you might need to get before the storm hits. Same with the deer. They are probably doing as much as they can to prepare before the storm hits. By the way, deer can detect a storm that is moving in about 48 hours before it actually happens, just like our modern weather equipment! We haven't beat the deer just yet in how long we can predict a storm is going to happen before it hits! I hope that this article helped with understanding the way deer act with the weather.
Saturday, December 17, 2011
Deer Prefer Acorns
Acorns. Deer and squirrels and bears love them. Where there is acorns you will find deer and squirrels. If you were a deer and had to chose from going long distances to food plots out of cover and traveling far away from bedding areas or staying close to home having an all you can eat buffet of acorns in a secluded spot where you would be safe, which would you chose? They are like a deer candy, a treat after eating a food plot meal. Kind of like kids going to eat ice cream after eating a good lunch.
Deer usually go for the acorns that have the least amount of tannin in them, which makes the acorns bitter. Going form the least amount of tannin (the most liked) to the most tannin (edible but not preferred) on the preferred acorns I have comprised this list of the top 4 preferred acorns.
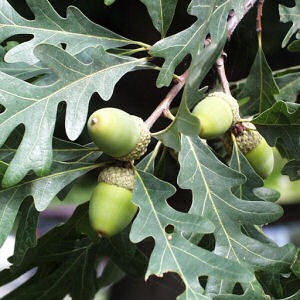
1. White Oak Acorn
This picture shows White Oak leaves with its acorns. The White Oak acorns have the least amount of tannin in them out of all the other acorns.
2.Pin Oak Acorn
 I couldn't find a picture of the Pin Oak showing its leaves and acorns like the picture above, but if you find this tree you will find its acorns. This type of acorn has low to medium tannic level
3.Red Oak acorns
 This acorn has medium tannin levels.
 4.Black Oak Acorns
These acorns have medium to high tannin levels which makes them very
bitter.
Deer will eat all of these acorns, but see if you have one of the top two in your area! If you don't, deer will eat the last two also. Good hunting!
Deer usually go for the acorns that have the least amount of tannin in them, which makes the acorns bitter. Going form the least amount of tannin (the most liked) to the most tannin (edible but not preferred) on the preferred acorns I have comprised this list of the top 4 preferred acorns.
1. White Oak Acorn
This picture shows White Oak leaves with its acorns. The White Oak acorns have the least amount of tannin in them out of all the other acorns.
2.Pin Oak Acorn
3.Red Oak acorns
These acorns have medium to high tannin levels which makes them very
bitter.
Deer will eat all of these acorns, but see if you have one of the top two in your area! If you don't, deer will eat the last two also. Good hunting!
Monday, December 12, 2011
Essential Skills for Survival
These are seven essential survival skills that everyone needs to know if your caught out in the middle of nowhere and need to survive. I will show you how to make a fire in almost every weather, types of shelter, find food and water, dress right for the climate, signal for help, and first aid.
1.Fire
Fire is a great confidence builder. It will keep you warm, cook your food, purify water, and keep animals away. But we need to start the fire. Okay, lets do so.
First you can use matches to start a fire. Some waterproof camping matches would work well. Or you could bring a cigarette lighter with you which will light over 1,000 times and will work even when wet. Flint and steel will also work too. Using a magnifying glass will work if the sun is shining brightly and overhead. Move the lens back and fourth until the sunlight is shining though the lens in a bright, small dot. This way it won't take long to start a fire. This will also work with a camera lens in the same way.
Tinder can be small dead twigs, dead grass, the inner bark of dead trees, dead leaves, and dry evergreen needles. You can also carry a little bag full of tinder just in case it rains.
2.Shelter
Now that a fire is built, you will need shelter.
A lean-to shelter would work well. You find 2 trees that have a good sturdy branch about 6 feet above the ground. Remove all of the branches near it except one one the same side of each tree. Find a thick sapling near 10 feet tall and use it to lay across the two branches to form the ridgepole. Find other saplings (big saplings that have been knocked down will work too) Around 8-10 feet long and lay them on the ridgepole to form the roof. Then weave flexible twigs and sticks through the roof poles to make the wall or use evergreen branches.
If you brought a tarp with you then you can make an A-frame shelter quite easily. Simply lean a downed tree against a fork in a tree a couple feet from the ground and put the tarp over it. Then tie the tarp down on both sides. If you don't have rope or twine to tie it down then you can use good sized rocks to weigh it down on both sides.
3.Water
Water can be found everywhere on the planet. If there is a stream close to your campsite then go fetch some water and boil it over a fire for ten minutes to kill all the contamination that the water may contain. You can use a pot if you brought one or a rock that can hold an amount of water. However, if you have no choice, then drink the cleanest and coldest water you can find.
4.Food
Food is accessible even in the most remote areas. If there is a creek that is big enough or a pond there may well be fish in them. Fishhooks can be made from animal bones that have been sharpened, nails can be made into fishhooks by bending them, even thorns can be made into hooks. If you don't have fishing line with you, you can make boot laces into fishing line and a leather belt cut into thin laces will work too. As I've written down in another article about minnow traps, you can catch those and use them as bait or you can eat them. Just squeeze them to take the waste matter out of them and you can eat them raw or roasted.
Small game can be caught by making a snare by tying a hangman's noose by tying a loop at one end of a piece of string, wire, cord, or twine and pushing the other end though the loop. When pulled on, this loop will tighten, strangling the animal till the survivor arrives. The animal will put its head through but won't be able to pull its body through.
5.Clothing
You need to be ready when you go out into the wilderness to wear the proper clothing for that climate. And pack for the worst thing that could happen. You will need the extra clothes to keep you warm and dry.
6.Signaling for help
If you need to signal for help. You can get to a clear area and make an SOS sign with rocks or pine boughs. SOS, by the way, isn't an abbreviation, it just stands as a distress signal. A fire can also work well because rescuers can see the smoke. And if an aircraft is about to fly over you, try to get into an open area and hold both hands up. This signal means "I need help". Don't hold up just one because that signal means "I don't need help." You can use reflective mirrors to get the pilots attention by putting the reflective light inside the cockpit. Then after you get the pilots attention, (which you can tell after the pilot rocks the plane side to side or after they "nod" the plane) do your two hand signal.
7.First Aid
Always bring a first aid kit just in case you need to treat any injuries that might happen. At least bring along bandages and alcohol swabs to clean cuts. You can also bring Q-tips and plenty of water purifying tablets if you want them.
Friday, December 9, 2011
Minnow Traps
Your exactly in the middle of nowhere. You are trying to survive and get back to civilization. You spot a stream off in the distance. You go to it thinking it might gold some fish. When you get there, you see that its too small to hold big fish, only minnows. There are some minnows swimming around, and you don't have a trap. Then you see a discarded water bottle lying in the stream. Now you can make a trap.
Making a trap
You can make a minnow trap with one or two bottles. I will show you how to make a trap with the on bottle for now.
One Bottle
Supplies:
-a bottle
-scissors or a kinfe
-string or twine
So now that you have the supplies, you need to make the bottle trap. Follow these steps:
1. Take the bottle and cut the cap off a couple inches below the cap
2. Now put the top that you cut off and put it inside the bottom part of the bottle to where the cap is facing the bottom (and if the cap is on take it off)
3. Punch in some holes with your knife or with an awl that is on some types of knives
4. Thread some string through the holes and tie it off with a strand left to tie to something near the shore so it won't float away
To remove the fish, just pull the string out and get those fish. Minnows are edible and can keep you from starving if big fish are hard to catch. Hope this trap works!
Thursday, December 8, 2011
Dakota Firehole
The Dakota firehole is a very efficient fire pit; it uses less wood and produces more heat. This little fire hole is easy to make and offers (after you dig it) you less work to get firewood because of its efficient use of firewood. This fire pit may require more work than just having the fire on the ground, but it produces much more heat for cooking and warming.
Where to put it
Now we need to know where to put the Dakota firehole.
Now that we know where to put it, now we have to dig it!
How it works
 The diagram shows how the firehole is so efficient. The hot air produced by the fire powerfully sucks in air though the airhole making the fire hotter. A cycle then develops: as the fire gets hotter, the more air gets sucked in making it even hotter. This means more heat with less fuel. This also means a hotter fire = less smoke. The heat is concentrated in an upward direction because of the chimney where you can use the heat for cooking and warming yourself.
Where to put it
Now we need to know where to put the Dakota firehole.
- Don't put it in areas that are hard to dig. Such as rocky areas or places filled with tree roots.
- Where soil is wet to where the pit might fill in with water.
- Dry soil such as sand because it might not hold its shape when dug into.
Now that we know where to put it, now we have to dig it!
- First dig a hole that is about a foot deep and has an circle opening at the top about a foot across.
- Then find out the direction the wind is blowing.
- Once the wind direction is determined, start digging a hole around 6 inches across about a foot away from the main pit.
- Angle the tunnel to where it will meet the bottom of the pit, this is the airhole of the pit that makes the firehole so efficient.
How it works
Wednesday, December 7, 2011
Basic Bluegill Fishing
Bluegill are fun to fish for. They are easy to catch, aren't as wary as other species of fish, you don't need to be a pro fisherman to catch them, they fight good for their size, and they take a verity of baits. They can be caught with a bamboo pole with hook and worm or the most high tech fly rod you can think of.
Baits
Bluegill love earthworms, night crawlers,wax worms, red worms, and crickets. If their big enough, they will strike at small minnows too. For artificial baits to use for bluegill fishing you could use 1/32 size jigs or smaller. You may also use small poppers and spoons
Tackle
The type of tackle usually used by anglers is light or ultra-light tackle. You can also use fly-fishing tackle too.
Saturday, December 3, 2011
Outdoor animals
These are a two of North Carolina's animals.
 This is a Northern Bobwhite. Bobwhite are related to Turkeys and Chickens. These little birds are 10 inches long and somewhere around afoot wingspan and weighs 6-8 ounces. They like to eat seeds, insects, fruit, and tender leaves. This bird loves the grassy areas and nests in groups called coveys. The male and female can be distinguished by the feather coloration on their heads. The males have white and black head feathers and the females have a brownish head feather color on their heads. If they need to get away from predators then they will either freeze in place and let the predator pass them or they might try to outrun them. But they may also take flight. When they take flight the flapping of wings and the explosion of birds is loud if you stumble upon them and they take flight. The usual flight lasts near 5 seconds and covers close to 150 ft.
Quail live short lives, which is around 5 years, and usually less than 20 percent live to a year. To be 3 years old in quail standards is a well lived life. A 5 year old quail in quail standards is very old. The usual loss of life is because of predation. Even the eggs are hunted. A rat snake will eat eh eggs and if it catches the adults it will eat them too. To counter this, Quail are high productive breeders, which is God's way of designing them.
 This is, as you probably know already, is a Whitetail Deer. These deer are strong swimmers and fast runners. They also can run up to 30-40 miles per hour to get away from something if they need to. Some of their favorite foods are grasses, vegetables in gardens, and acorns. They like creek and river bottoms, woodland, and grass plains.
The breeding season (or the "rut") happens in autumn when the bucks start to mark off their territory and challenge any bucks that stray into their territory looking for does. By the way, bucks don't have horns but they have antlers. Horns stay there forever on the skull while the antlers fall off yearly and grow back the same year. After the rut things on the deer calender quiet down and in January - February the bucks lose their antlers and in the spring does give birth to 1 to 2 fawns.
For more information visit: http://www.ncwildlife.org/
Quail live short lives, which is around 5 years, and usually less than 20 percent live to a year. To be 3 years old in quail standards is a well lived life. A 5 year old quail in quail standards is very old. The usual loss of life is because of predation. Even the eggs are hunted. A rat snake will eat eh eggs and if it catches the adults it will eat them too. To counter this, Quail are high productive breeders, which is God's way of designing them.
The breeding season (or the "rut") happens in autumn when the bucks start to mark off their territory and challenge any bucks that stray into their territory looking for does. By the way, bucks don't have horns but they have antlers. Horns stay there forever on the skull while the antlers fall off yearly and grow back the same year. After the rut things on the deer calender quiet down and in January - February the bucks lose their antlers and in the spring does give birth to 1 to 2 fawns.
For more information visit: http://www.ncwildlife.org/
Friday, December 2, 2011
Putting Decoys and Calls together
Decoys and calls are very good for attracting game animals to come to you. The use of these two things combined is very effective. The decoys "show" that that type of animal that your trying to call is there, and the calls give effect to the decoys to make it seem like the animals are calling to each other. The decoys and calls you use depends on the type of animal that you are hunting. But with these two things being used at the same time the animal sees the decoy and hears the calling and heads toward it. Then you get your shot. For deer, you could use some inflatable, 3D, etc. I think that 3D is best, and the use of a buck grunt call is good for that. But if you have 2 buck decoys you could put them to close together to were there antlers are touching and use the rattling call. For geese, you would (of course) use geese decoys and calls. All in all, use the decoys and calls that are appropriate for the type of hunting you will be doing.
Thursday, December 1, 2011
Learning About the Outdoors
Hi kids, and everyone!
If you are thinking about learning about the outdoors, this would be a good place to start. I will help you learn how to identify a few trees by their leaves and learn about a couple animals.
Trees
 This leaf is from a White Oak tree. Do you know what its seed is called? I know you know the name of the seed but maybe you don't know it comes from this tree. The seed is called an acorn!

This leaf is from a Hickory Tree. Its seed is called a Hickory Nut.
 This leaf is from a tree called the Sugar Maple.
Animals

This is an Eastern Gray Squirrel. And one of its favorite foods is acorns! The Eastern Gray Squirrel makes its home up in the trees by making nests and it also lives inside trees where trees are hollow.
 This is a picture of a Whitetail Deer. This is a buck, or a boy deer. See the things coming out of the buck head? Those are called antlers. The does, or, girl deer, don't have antlers like bucks do. Does don't have antlers at all. Whitetail Deer love to eat grass and all kinds of plants, even acorns!
If you are thinking about learning about the outdoors, this would be a good place to start. I will help you learn how to identify a few trees by their leaves and learn about a couple animals.
Trees
This leaf is from a Hickory Tree. Its seed is called a Hickory Nut.
Animals
This is an Eastern Gray Squirrel. And one of its favorite foods is acorns! The Eastern Gray Squirrel makes its home up in the trees by making nests and it also lives inside trees where trees are hollow.
White vs. Red Acorns

First, we must identify the white oak leaf and the red oak leaf to tell what oak is which. The leaf on the left is the Red Oak leaf and the one on the right is the White Oak leaf. Now that we know what leaf belongs to what tree we will turn our attention to the Red Oak.
- The Red Oak produces more acorns that the White Oak
- The Red Oak acorns have more tannin in them, which makes them taste bitter
- The Red Oak acorns tend to be round and fat
- The White Oak acorns have less tannin in them
- The White Oak acorns tend to be long and narrow
So in conclusion, just stick around an oak and you may see some deer.
Bow-plots
Hunt plots. This is where the magic happens. Deer love to meet there, and hunters follow them. Any small clearing can be made into a hunt plot. These little plots are like small little "grocery stores" out in the middle of absolutely nowhere. I 'm going to refer to them as "bow-plots" because you can shoot deer anywhere in the plot, and because of an ideal shape to plant the bow-plot.
Planting a huntable shaped plot
Though bow-plots can be any shape, and they usually range from 1 acre at most to however small you want it to be. The a good shape for a mini plot is a capital L or a crescent (hence the name "bow-plots", because a bow is crescent shape). If you plant this way, and if your plot is 1 to 1 half an acre in size, then you may consider putting two stands at that plot. This way you can sneak away without the deer on the other side knowing you were there. If your plot is smaller than half an acre, then I would suggest one stand at that plot, because deer will probably notice your going away if the plot is 1 fourth an acre or smaller. For hunting purposes a narrow plot is better than a wide one. This way any deer that walks into the plot is likely in bow range, even if he is on the other side of the plot. But for plants, a wide plot is better. In that case, plant the plot pointing east to west to give the plot maximum amount of sunlight everyday. But take make use of what is available to you. Any small clearing should do. Even a couple of downed trees that are next to each other can work because it lets in sunlight.
What to plant
Okay, now that we have a huntable shaped plot, what do we plant? Many brands of food plot mixes work well, such as Antler King, Whitetail Institute, Evolved Habitats, and Tecomate. But if your not looking for a brand name, then I would suggest that you have a mix in your plot made up of chicory or rape with some clovers and some turnips or radishes for winter.
Why they work
Bow-plots work because whitetails feel more comfortable in these little plots because they are only a jump or two from cover. They also work because (as I have said earlier) that any deer that comes into the plot is likely to wind up into bow range. Usually they are located closer to bedding areas so deer are more likely to visit them in the daylight hours. They are places that deer will most likely visit a couple times of day, which will most likely be morning and late in the afternoon. Every buck in the area adds the plot to his trips around the area looking for scrapes of other bucks to challenge them in the rut and sniffing for does that are ready to breed. This is where the big guys are, because of their experience of looking for danger, they feel more comfortable in these secluded spots. Fatal mistake. If your there when he walks in, he's in your cross-airs.
Tuesday, November 29, 2011
Group Gun Safety
When carrying guns in a group, never point the muzzle at someone. If there are 3 hunters walking beside each other, the one on the right points his or her gun to the right. The person on the left points their gun to the left, and the person in the middle points the muzzle behind them or at the ground in front of them. Keep this quick tip in mind when you are hunting in a group.
All About Tree Stands
A tree stand is a good way to get above the level of the game your after. Deer, coyote, bear can be hunted successfully with a tree stand. They've become very popular in the last few years because bow and firearm hunters can use them. They have some very clear advantages, but they also have some drawbacks too.
Advantages
Drawbacks
Hang-On stands
These are stands that you use if you want to keep a stand up in a tree for a while. It uses climbing steps or segmented ladders. It can still be moved but you would have to take it down and set it up all over again. They can be cheaper than most ladder stands when you combine the stand and climbing steps cost together.
Climbing Stands
If you want to go one place to another with a stand a climbing stand is what I'd recommend. You can take it up and down a tree with relative ease. You climb the tree by pulling the top part of the stand (the part you sit on) with your hands and the bottom part (where you put your feet) with your feet. It is recommended that you don't use this stand on crooked trees or trees that have ice or snow on them.
Ladder Stands
If you want a permanent stand somewhere, I recommend the ladder stand. This kind of stand can be bought for 1 person or for 2 people if you have someone with you.
Tree stand safety
If you get in a tree stand, always wear a full body harness to protect you if you fall. Good brands of those would be Tree Spider and Hunter Safety System. If you should fall with a harness on :
Haul your equipment up to you with a haul line. Never climb holding you equipment. And never haul up equipment that is loaded or has a knocked arrow. When you haul up a firearm, keep the muzzle or the barrel of the gun pointed down, and have the stock pointed at you.
It is important to always be safe when hunting, No matter what.
Advantages
- You can spot game sooner than you would on the ground
- A good back stop for arrows and bullets that miss due to shooting downward
- It positions the hunter above the animal's normal field of vision
- Makes the hunters scent less detectable and movement less noticeable
Drawbacks
- Risk of injury resulting from falling
- Difficult to carry, especially large portable stands
- No protection from cold or wind
- Little room for movement
- Not being able to move towards game while hunting
Hang-On stands
These are stands that you use if you want to keep a stand up in a tree for a while. It uses climbing steps or segmented ladders. It can still be moved but you would have to take it down and set it up all over again. They can be cheaper than most ladder stands when you combine the stand and climbing steps cost together.
Climbing Stands
If you want to go one place to another with a stand a climbing stand is what I'd recommend. You can take it up and down a tree with relative ease. You climb the tree by pulling the top part of the stand (the part you sit on) with your hands and the bottom part (where you put your feet) with your feet. It is recommended that you don't use this stand on crooked trees or trees that have ice or snow on them.
Ladder Stands
If you want a permanent stand somewhere, I recommend the ladder stand. This kind of stand can be bought for 1 person or for 2 people if you have someone with you.
Tree stand safety
If you get in a tree stand, always wear a full body harness to protect you if you fall. Good brands of those would be Tree Spider and Hunter Safety System. If you should fall with a harness on :
- Don't panic, your harness will hold you
- Signal for help
- Get back into you stand as soon as possible
- Take action to avoid suspension trauma (covered later) if you need to be rescued
Haul your equipment up to you with a haul line. Never climb holding you equipment. And never haul up equipment that is loaded or has a knocked arrow. When you haul up a firearm, keep the muzzle or the barrel of the gun pointed down, and have the stock pointed at you.
It is important to always be safe when hunting, No matter what.
Hunting Techniques
Hunting is my favorite sport. It is fun to track down, find, and call to the game you after is very cool. This will cover the 6 basic types of hunting .
There are 6 main types of hunting that basically every type of hunting will fit into. Still hunting, stalking, flushing, posting, ground blinds, and elevated stands, these will be described in further detail later. For deer hunting in Snow Camp in central North Carolina, you would usually use the last three techniques. For squirrel hunting, you could use still hunting, stalking, and posting. For rabbit hunting, you would probably use flushing. Every animal you hunt you will have to most likely use one of the six types of hunting to properly hunt the animal your after.
Still Hunting
Still hunting, as it is name implies, involves being still and listening most of the time. You need to be stealthy while walking in that animals territory. Stop frequently to scan and listen for game. You should be still 10 times as much as walking or moving. Keep low, because the figure of a human will frighten most animals. Keep some binoculars with you to scan for game in open terrain to spot movement of game. When you hunt this way effectively, animals won't know your there, that's good! But hunters won't know your there either, that's bad. So always wear fluorescent orange.
Stalking
When stalking, you follow the game your after by using signs that lead to that animal or animals. Or close the distance to the animal already spotted. You can follow tracks and if in the morning, a "dew" trail trough brush or leaves. Or you can follow the sounds of the animal. Or you could get closer to an animal for a better shot. This type of hunting requires you to stay very focused on what you are doing, you have to stay downwind, stay silent, stay alert, and stay patient.
Flushing
This type of hunting requires making noise, movement, or dogs to cause game to becomes nervous and run or fly from cover. Pause often while trying to flush game. Varying your pace will make the animals think that they have been detected and more likely to leave cover.
Posting
This involves sitting or standing in one spot. The place could offer a vantage point or along the animal's trails.
This type of hunting is effective when you know where the animal's travel every day and where a blind or tree stand isn't available. A good posting site is a place where you can swing your firearm freely or draw your bow back.
Ground Blinds
These are makeshift or temporary ground structures that offer concealment for the hunter. You should put them: downwind based on wind patterns at a certain time of day, away from the sun, and where foreground and background are safest.
Elevated Stands
Elevated stands (elevated blinds or tree stands) conceal and put the hunter above the game animals the hunter is after. Elevated blinds of tower stands are usually big boxes that conceal the hunter above ground level. Tree stands are stands that are placed against or on trees. In these always wear a full body harness to catch you if you are to fall.
Monday, November 28, 2011
Welcome to Snow Camp Outdoors
Hi!
I would like to welcome you to Snow Camp Outdoors! This is the first post of many to come and just a beginning to the blog with information about the outdoors.
I would like to welcome you to Snow Camp Outdoors! This is the first post of many to come and just a beginning to the blog with information about the outdoors.
Subscribe to:
Posts (Atom)